According to the rules of business etiquette, a man must wear a tie. Not everyone can tie the accessory correctly. Several knot tying schemes are proposed. It is important to know the advantages of each, since the wrong choice leads to trouble during work: the tie has to be constantly corrected or bandaged. You can prevent the problem by using a double knot. It looks good, doesn’t wane over time.
What does a double knot look like?
You can tie a tie in this way, provided it is of sufficient length, using medium-weight fabric. Only in this way the work will be neat, not cumbersome. It is better not to take ties with a dense lining, the finished knot turns out to be too wide. The formation scheme consists in a double turn, with the wide part around the narrow section of the accessory. Tied in this way, the tie is freely adjustable. In creating a business image, such a scheme adds confidence.
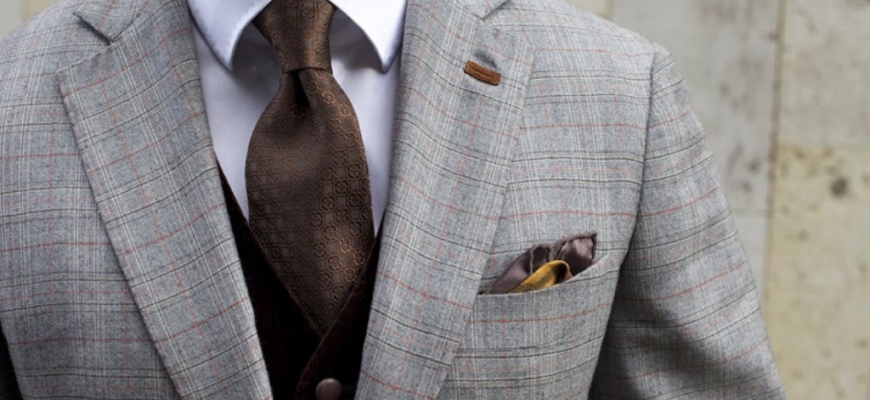
The laconic outlines of the double knot on the tie look nice and neat. The result of the chosen scheme looks strict, so it is used to create a business style, going to a celebration or any social event. If you tie the accessory correctly, you can get an equilateral triangle. Its base is dense, strict. Differs in presentability, solidity.
The considered scheme has advantages over other methods:
- the work turns out to be symmetrical;
- even a tightly knotted fabric unravels easily;
- the finished puff does not pinch the fabric.
The scheme is suitable for men with a narrow chin. If you need to visually make the neck shorter, it is better to use the option using a wide product.
With what is combined
How to tie a tie, in which of the many ways, depends on the chosen shirt, suit. The finished piece should match the collar type of the shirt. There are 30 types of them, so a man pays attention when tying a tie according to the scheme in question. On this issue, the following types of collars are distinguished:
- Classical. Neat, slightly pointed ends, regular shape.
- «Kent». Widened and pointed ends.
- «Shark». Resembles an open shark mouth.
With other types, the option under consideration will look inappropriate. To form a «lump» you require a lot of space under the collar, and otherwise it will raise the ends, which is completely unacceptable, the strict image will be ruined. To properly tie any type of tie, you should practice in advance, try on the accessory with the existing shirts. This is necessary for the quick formation of a knot in order not to be late for an important meeting.

When choosing a node, a formation scheme, clothing items should be considered. First, a suit is chosen, then a shirt, and last a tie. The task is not simple, as it seems at first glance. The tied accessory should emphasize and put an end to the chosen image. The wrong choice can ruin the image. As for the color, the fabric of the accessory should not merge with the shirt and suit, but be in contrast with them.
How to tie a double knot
The double knot is elementary in terms of execution. It does not require any special skills and training, even a beginner can handle it. You can tie it up using a trick that allows you to make the idea more intricate. Even with double wrapping of the accessory, the work is compact and neat.

Ties without rigid filler and of sufficient length are suitable for this method. To form a knot, you need to turn the wide end of the product 180 degrees. This will give stability for the second turn, allow you to competently do the job.
Instructions
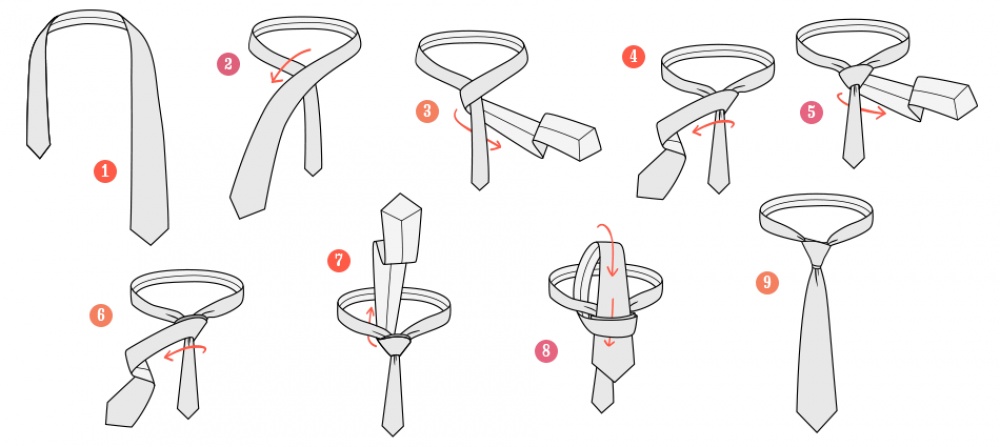
The work must be done step by step:
- Tie the right side of the accessory around the neck. In this case, the wide side should be on the right and be 30 cm lower than the narrow one.
- Cross both ends. In this case, the wide side should be turned to the right 180 degrees to the side of the wrong side. Pass it under the narrow side.
- Stretch the wide end to the left, put on the narrow one.
- Next, you should stretch the wide part to the right under the narrower end.
- Then stretch the wide part to the left, first place it on the narrow end.
- Next, pass the wide end through the neck loop from the inside up.
- Skip the wide side into the formed loop.
- Spread out, align the edges, tighten the knot.
How to tell if the tie is tied correctly: the end of the wide part should be in the middle of the belt buckle. An accessory that is located above or sticks out from under the jacket looks ridiculous. The narrow end of the fabric should be 2 times shorter than the wide one.
A double knot on a tie is not a way to secure the item. It combines simplicity of execution, elegance and practicality. It can be tied in a few steps. In the process of wearing, the accessory is comfortable, looks neat and fashionable.


