Every man who wants to look attractive should know how to tie a tie. This accessory complements any costume and has many knot options. This helps each of the stronger sex to choose the appropriate option.
Main rules
Before tying a tie, it is important to read the basic rules. To achieve this, you should follow the following recommendations:
- Tie a tie near the mirror. This will help you follow the process and do everything as quickly as possible.
- Button up your shirt and turn up your collar. In this position, it will be easier to create nodes.
- Determine the length of the tip that will be used to decorate the composition. A wide edge is often used for this. In this case, a thin fragment should be placed above the navel.
- After fixing the accessory, lower the shirt collar and look in the mirror to make sure the knot is neat.
Length of tie
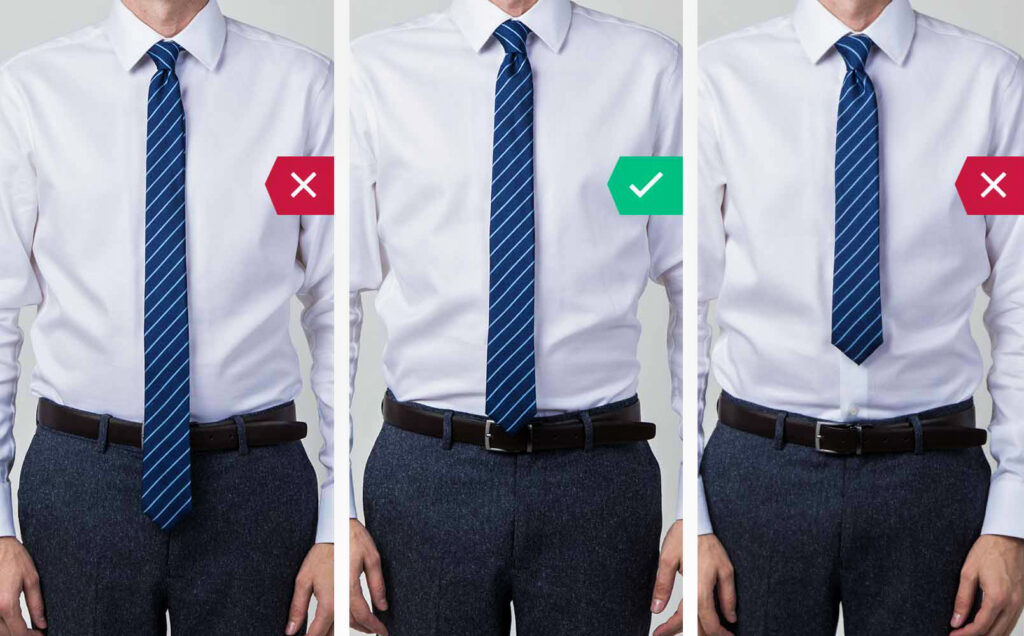
To understand how to tie a tie correctly, it is important to decide on its length. It is recommended to select it considering the height of the man and the size of the collar. According to the rules of etiquette, the end of the tie should reach the belt of the trousers. Read more about the selection of the length in our article: How to choose the right tie length.
The most common and simple nodes
Today, there are many known tie knots, each of which has its own specific features.
Classical
It is recommended to choose such a tie knot for events that have a strict dress code. In this case, the wide part should be placed on the left, and the narrow one - on top of it. Then it is recommended to cross them, wrap the narrow side with the wide side and insert from the inside above the intersection of the two parts.
Learn more about the Classic Node in our article.
Double
This tie knot is also called "Prince Albert". It looks quite expensive and is perfect for tying a tight factory lined tie. At the same time, it is not recommended to tie thin accessories in this way.
Read more about Double Knot in our article.
Kent
This is the easiest knot any man can learn to tie. It is also called a small knot. This is due to the minimum number of turns that the tip of the tie performs. This shape is in perfect harmony with dense tweed, wool or silk accessories. It should be chosen by tall and large men.
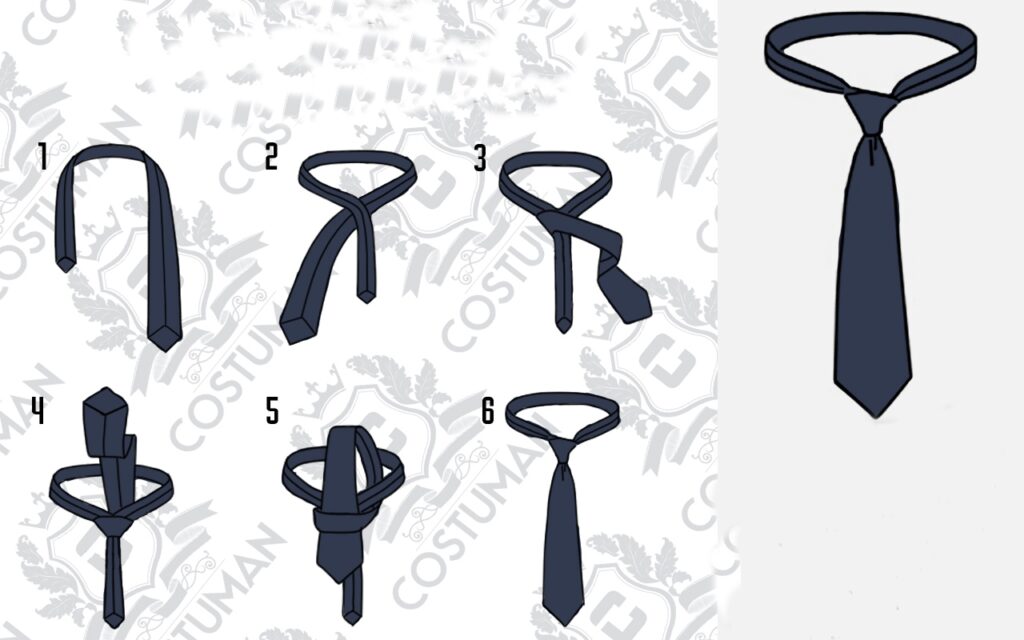
Kent has a secure fit. It does not need to be corrected frequently. To fix the tie around the neck, first turn the wide part of the product 180 degrees. This will keep the fabric in place and help you create a nice, crisp knit pattern.
So, in stages, the process of tying a knot looks like this:
- Prepare the accessory for typing. In this case, it is recommended to place the wide side on the left with the seam up.
- Wrap the narrow end counterclockwise.
- Pass the base through the collar tape. At the same time, it is not recommended to tighten it.
- Pass the wide part of the tie into the finished loop and pull it down. Finally, fix the knot.
Quarter
This tie knot was named the gentlemen's club, which was created at the end of the nineteenth century. This technique of knitting a man's accessory is considered universal. It can be used for different types of shirts and suit models. In addition, this pattern is combined with ties of various lengths and densities.
Kelvin
This buttonhole has an elegant shape. Therefore, it is gaining more and more popularity. It is recommended to start knitting a loop from the seamy side. At the end, the wider part should be passed through the front or back wall. Kelvin is recommended for shirts with a classic or small collar.
The knitting technique got its unusual name in honor of the famous physicist Kelvin. It was his theories about the structure of the atom, resembling a knot, that inspired British fashionistas to give such a name to the technique of tying a stylish accessory. At the same time, it is difficult to call it everyday. This option is only suitable for special events.
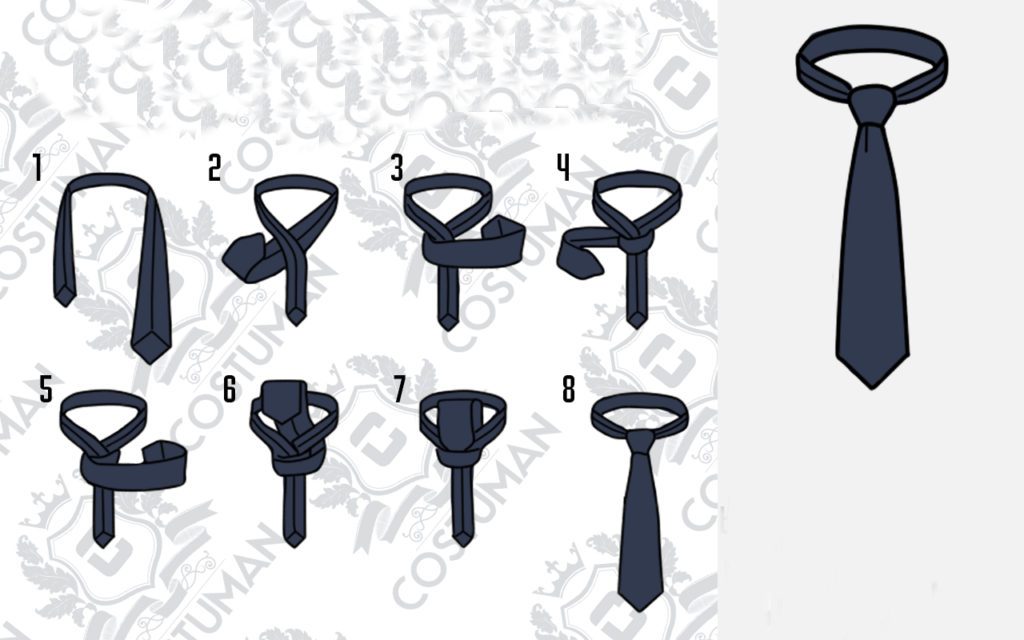
- Put on the accessory with the wrong side up. It is recommended to place the narrow part slightly above the navel.
- Place the wide end under the narrow end and cross them.
- Wrap the accessory counterclockwise, making a full turn.
- Carefully adjust the structure and prepare for the next turn.
- Wrap the base halfway.
- Bring the working part under the collar on the left. Do not tighten the accessory.
- Place the end of the base into the finished hole.
- Tighten and straighten your tie.
Pratt or Shelby
The founder of this technique was Jerry Pratt, who was a member of the American Chamber of Commerce. However, the technique gained popularity after the speeches of the presenter Don Shelby, who occupied a significant place in the show business of the United States.
This knot is in great demand among American politicians and businessmen. It is considered a testament to impeccable taste and has gained popularity in the business community.
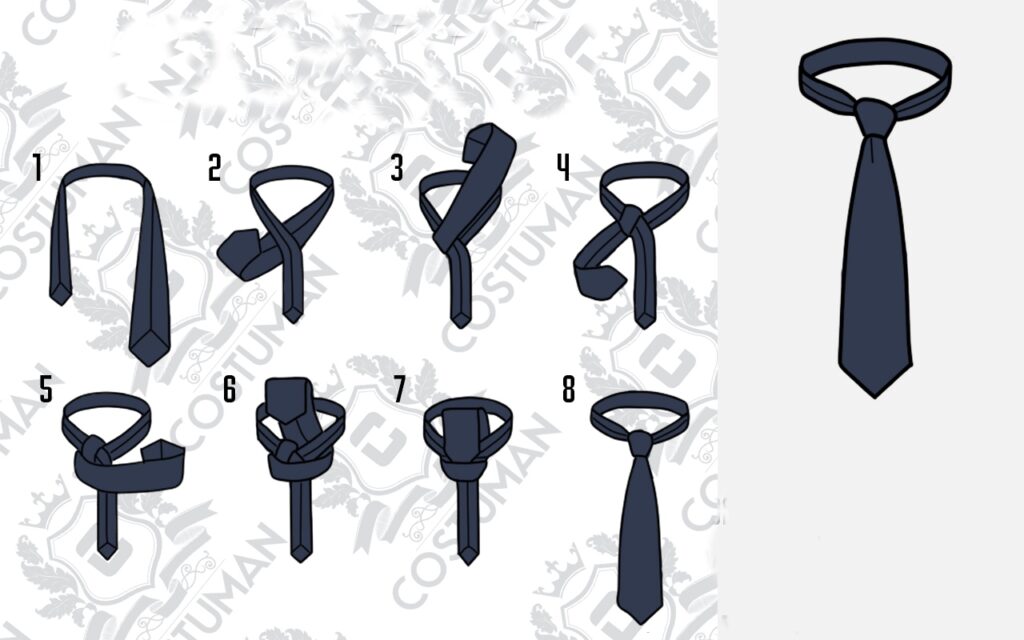
In appearance, the knot is similar to the classic Windsor. It can be used for wide and short ties. Also the diagram is suitable for lined accessories. This method is a great option for shirts with a medium collar and rounded corners.
How to tie a tie step by step? To do this, it is recommended to do the following:
- Prepare the tie by placing it on the neck with the seams outward.
- Cross the ribbons. In this case, the wide end should be located at the bottom.
- Direct the working part up. It should be behind the collar.
- Wrap the base clockwise. In this case, it is worth doing half a turn.
- Pass the end through the collar without pulling.
- Below the end of the base into the loop.
- Pull the outer part down and tighten.
Windsor
This technique got its name from the part of Duke Edward of Windsor, who preferred tight ties. The knot looks pretty big. Therefore, his fans should give preference to shirts with spaced corners.
Nikki
This knot owes its popularity to the industrialist Ernesto Kourami, who made ties. In shape, it resembles an inverted triangle.
This pattern works well with medium-weight fabrics that have quirky prints or embossed textures. Due to its simplicity, the knot helps to maintain the length of the material. When choosing a shirt, you should give preference to a model with a narrow collar. This option of tying the accessory ensures a long service life. The tie will not wear out or wear out for a long time.
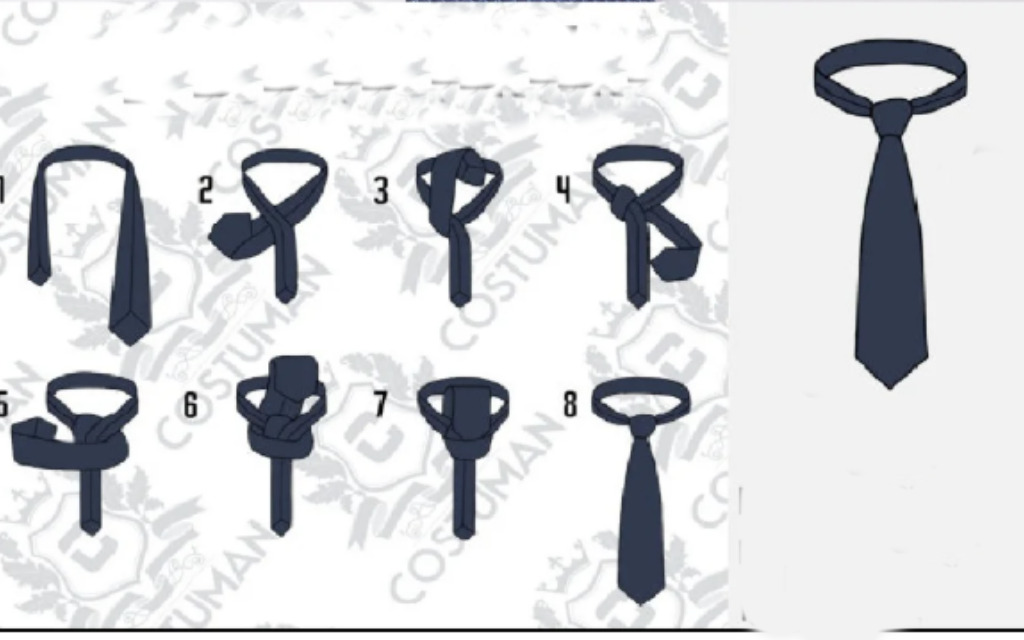
How to tie a tie in this way correctly? To do this, you should do the following:
- Place the fabric on the neck with the seam up. Place the narrow tip higher than the wide one.
- Cross the ends. In this case, the wide end should be placed under the narrow strip.
- Raise the working fragment and pass it through the loop on the neck.
- Lead the tip, lowering it to the left.
- Place it under the stationary edge to the right.
- Raise the working part through the collar.
- Thread the leading piece through the loop at the knot.
- Assess collar tension.
Oriental
This node is also called east. The scheme was invented in Asian countries. Its name is connected with this. This is one of the easiest ways to tie a tie. To get the desired effect, it is important to be extremely careful. If you make a mistake in the process, the accessory will quickly dissolve. This method is suitable for tall men. It is combined with wide accessories made of dense materials.
In order for a tie tied in this way to hold securely and not to come loose for a long time, it is important to follow the instructions clearly. Any mistakes will cause the need to correct the accessory all the time.
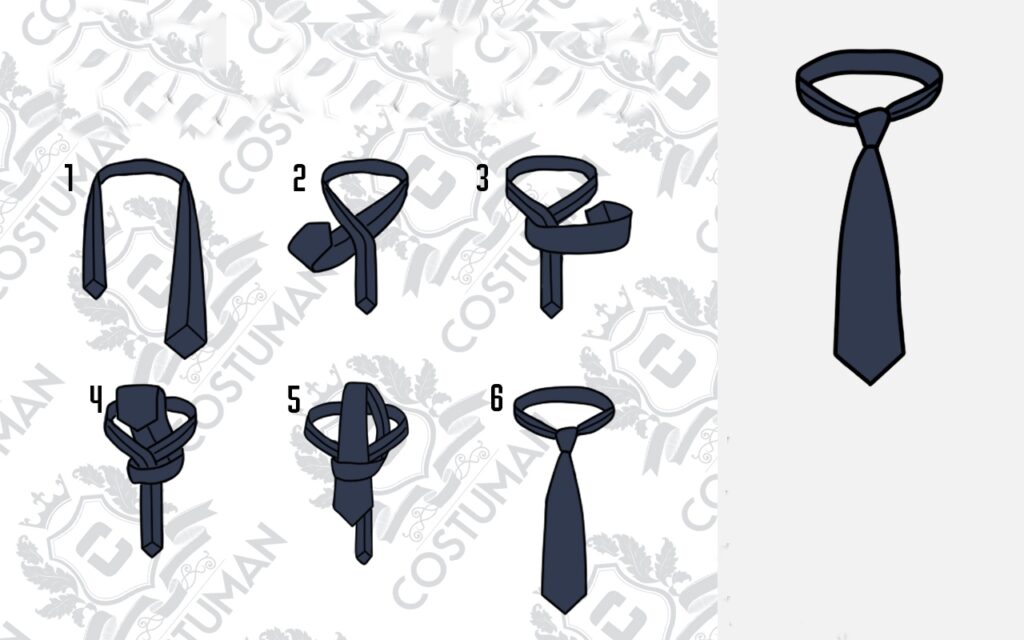
The step-by-step instructions for this easy way to tie a tie look like this:
- Place the tie with the seam up. Make the narrow part shorter and point to the right.
- Cross the bottom with a wide half with a narrow strip. In this case, the first edge must be directed to the right.
- Wrap the working end around the stationary half. In this case, it is recommended to move to the left.
- Raise the working part through the collar.
- Below the same edge through a small eyelet.
- Tighten the accessory and straighten the material.
More interesting nodes
There are many intricate knots that serve decorative purposes. These fancy patterns are considered to be more time consuming. However, they provide excellent results.
Eldridge
This beautiful and non-trivial knot was named after the inventor Eldridge. The main feature of the technique is considered to be the edge that participates in the process. When using this knot, knitting is carried out with a narrow edge.
Trinity
Tying this unusual knot is easy enough. At the same time, it looks very decorative. The finished knot looks like a hexagon. This knitting technique looks stylish and elegant, but it can only be used for informal events.
Van Wijk
This technique is characterized by an unusual elongated shape that resembles a spiral. Such a knot is versatile. It can be combined with fabrics of any width and texture. In addition, the knot can be combined with any shirt collars.
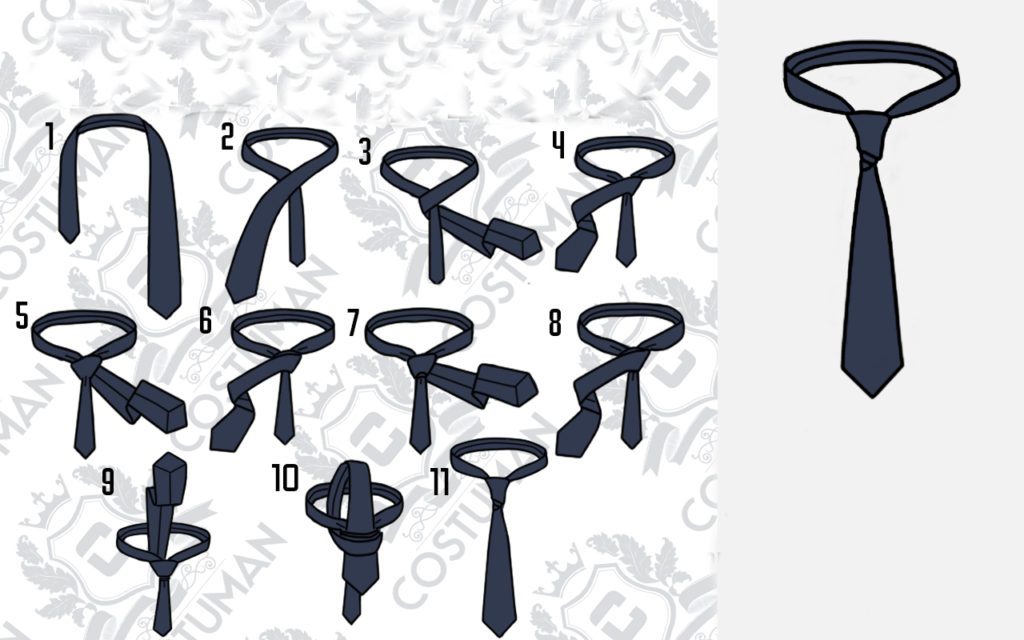
To implement this method of tying a tie, you should follow these steps:
- Place the tie around the neck, leaving the narrow section shorter. The long end is the base.
- Cross with the working part from above.
- Make half a turn under the narrow end, moving clockwise.
- Complete the turnover.
- Repeat half a turn again and finish it.
- Pass the base up through the collar.
- Insert the base into a complex loop.
- Tighten the knot and straighten it.
Balthus
This is a great solution for men of small size. A significant number of revolutions is considered a characteristic feature of the technique. This makes the tie short and voluminous. This type of knot is more suitable for thin and elastic materials. To get a harmonious result, it is recommended to choose a thin men's tie. In this case, the collar of the shirt, on the contrary, should be wide.
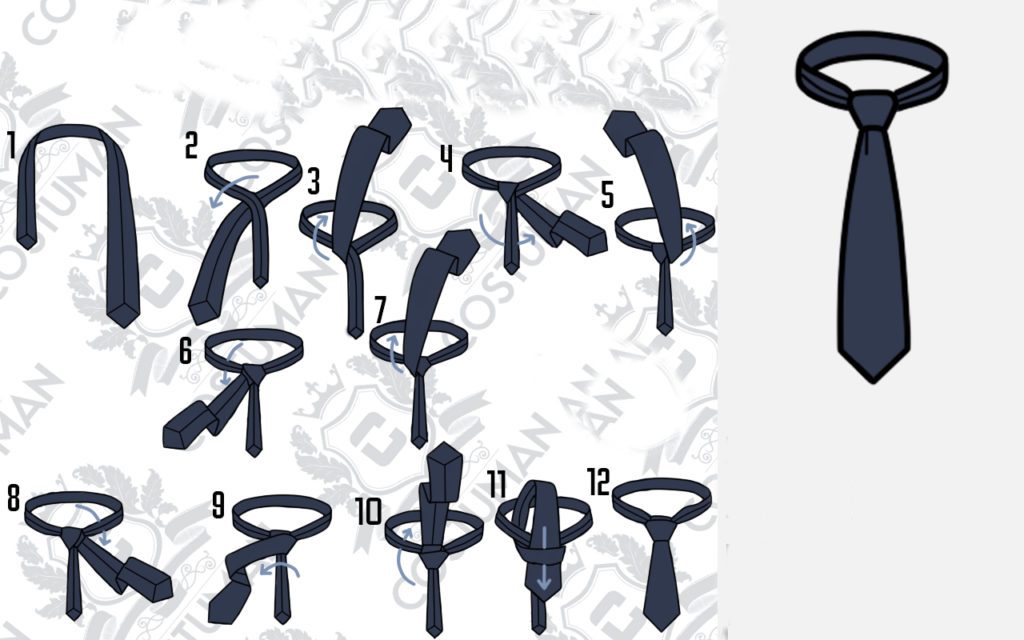
Before starting knitting, the fabric of the accessory should be thrown over the neck so that its narrow part hangs less than usual. So how to tie a tie beautifully? To do this, you should do the following:
- Place the accessory around your neck. This is done with a seam outward. The narrow part should be placed on the right.
- Cross the ends, place the wide part under the narrow one.
- Raise the widest part.
- Place this fragment behind the collar and lower it through the right side.
- Throw the working part over the collar again.
- Pull the edge down to the left.
- Raise the end again and tuck it behind the collar.
- Below the working tip over the right side.
- Toss it to the left over the stationary fragment.
- Tuck the hem behind the collar, lifting it up.
- Below through the eyelet in the knot.
- Pull on the working piece of the tie, carefully tightening the collar.
Hanover
The knot was named after the English dynasty of Hanover. The knot is completely symmetrical in shape and resembles a regular triangle. The node is distinguished by its impressive size. Therefore, it is combined only with wide collars of shirts. Otherwise, you won't be able to get a harmonious bow.
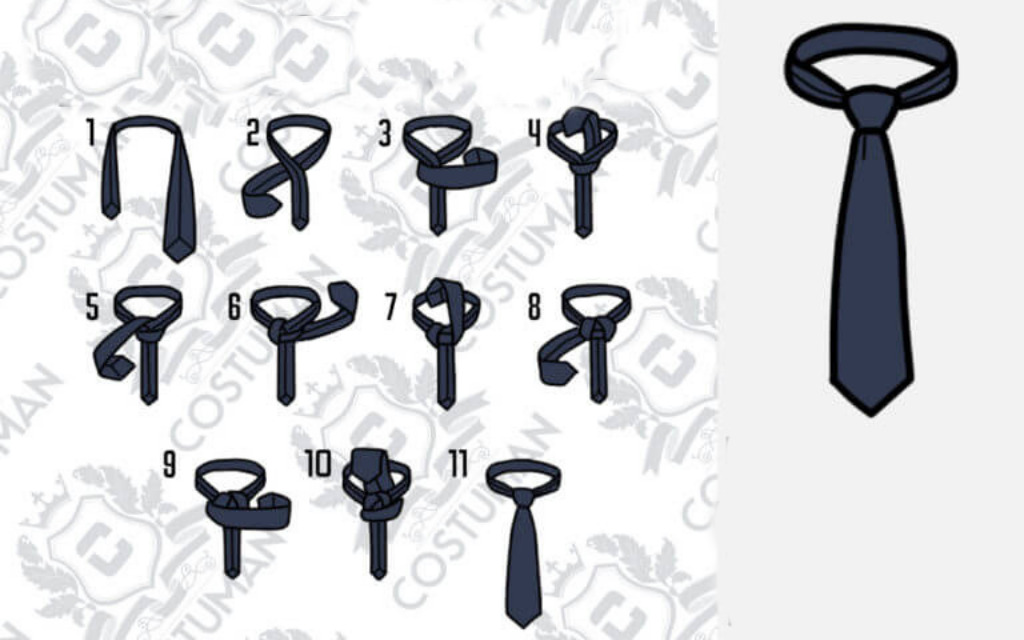
This shape looks good on small men. In this case, the material should be fairly light. With it, the accessory will look much more elegant.
How to quickly tie a tie? To do this, you need to do the following:
- Place the product around the neck. In this case, the seam should be on top, and the narrow part on the right side.
- Cross the 2 ends, placing the wider part under the narrower one.
- Throw the wide part over the narrow one. It is recommended to do this to the right.
- Pass the working part through the neck loop, pointing it up.
- Below it down. This is done through the right side.
- Wrap the tip around a narrow section.
- Throw the widest part over the collar again.
- Below the working part to the right. At the same time, you cannot tighten it too much.
- Wrap the wide end around the narrow end, moving to the left.
- Raise the working part through the collar and lower it through the eyelet.
- Tighten and straighten carefully.
grantchester
This technique can be realized with a long and lightweight material. The knot is large and goes well with wide shirt collars. This option is suitable for short men. Before creating such a knot, it is important to correctly determine the length of the narrow edge. Otherwise, the node will be out of place.
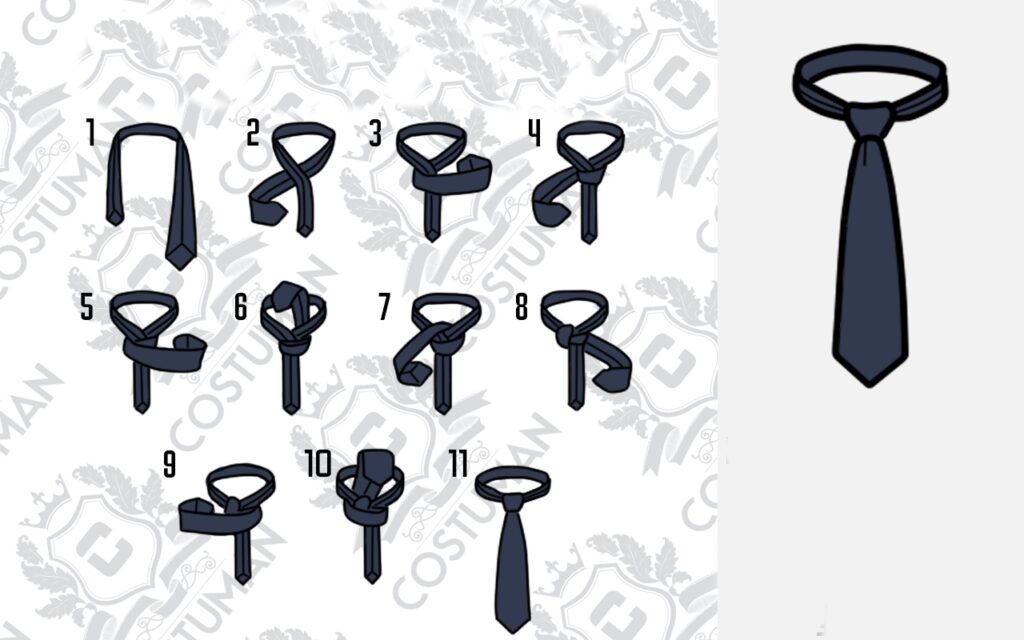
Diagonal
This is a time consuming technique that requires some skill. With the right approach, the result is very effective. The diagonal is considered a two-layer knot. This technique can be used for solid color accessories in deep shades. In this case, the fabric should be light.
The diagonal knot goes well with plain shirts. Against the background of bright prints, a complex knot will simply be lost. The collar of the shirt should be chosen as standard. However, the scheme is not suitable for everyday bows. It is used for special events.
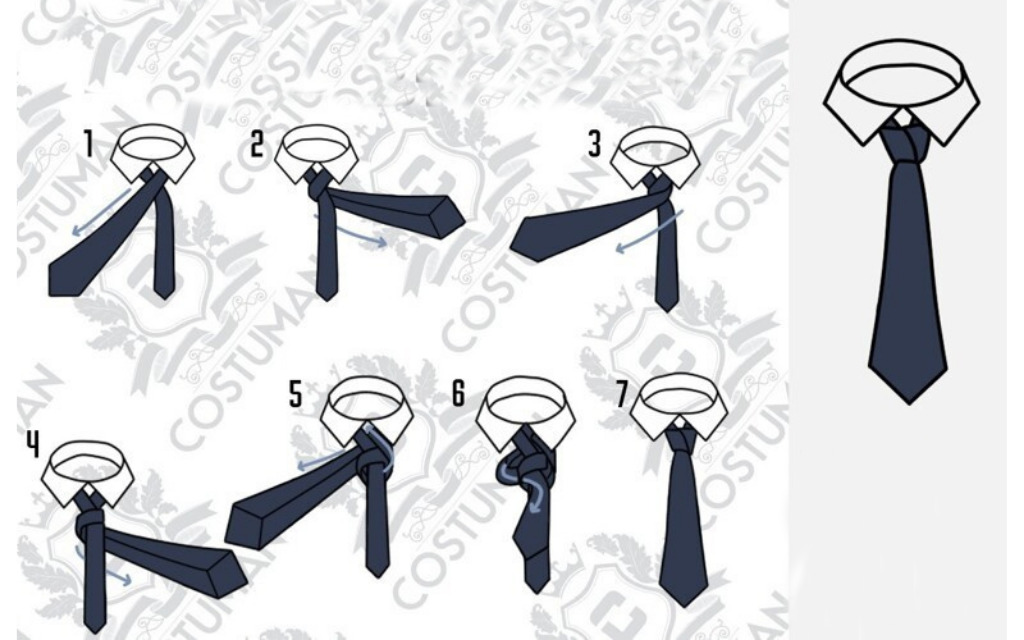
It should be borne in mind that a tie tied in this way is not only required to tie, but also to be untied. It does not dissolve itself, which sometimes creates some difficulties.
Wismar
This method of tying has gained popularity in the middle of the last century. The knot looks very unusual and complements evening bows well. The tie should be solid. It is advisable to choose an accessory made of soft shiny material.
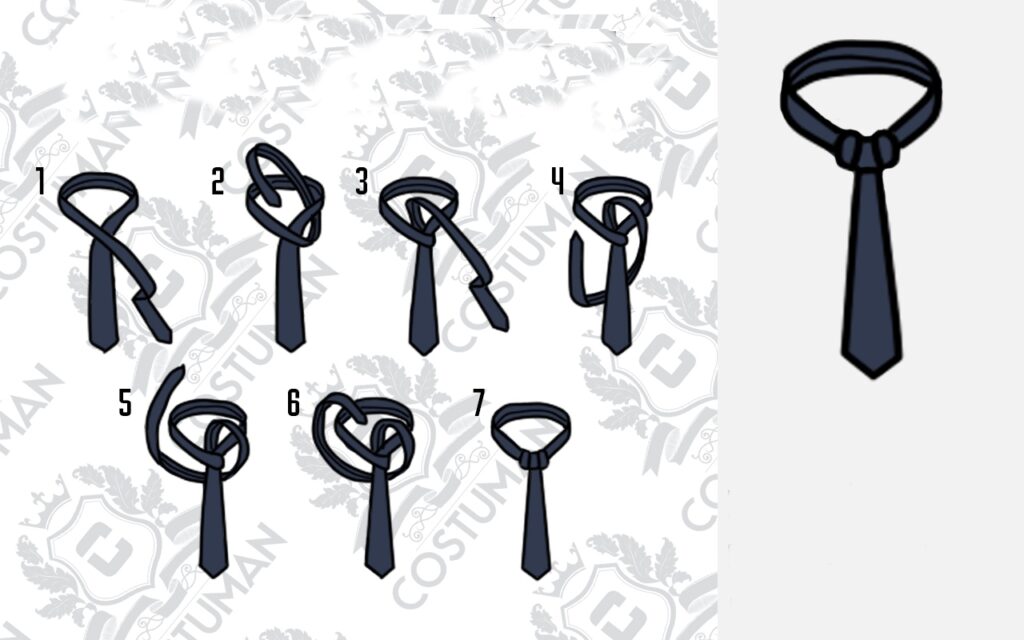
To complement the bow, you should use a shirt with a wide collar. This technique is recommended for men with a powerful neck. On other representatives of the stronger sex, the knot will not look so impressive. It is important to keep in mind that the ends of the tie must be the same.
Cavendish
This knot is characterized by an asymmetrical triangular shape. While it looks simple at first glance, it can be difficult to tie an accessory. The tie is suitable for creating casual bows as it seems too simple for formal occasions.
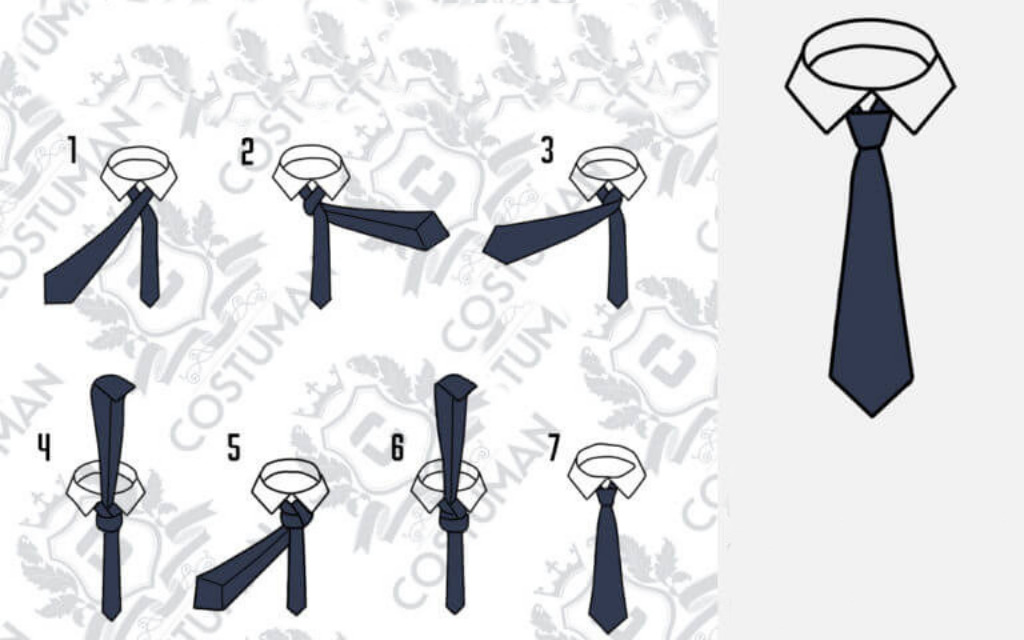
The Cavendish became widespread at the University of Cambridge. It is recommended to tie it on ties made of light and smooth materials. In this case, the shirt should have a classic or wide collar. The main difficulty in knitting a knot is considered to be the variety of sweeps of the main ribbon.
murrel
This unusual knot is considered very rare. In fact, it is a reinterpretation of the classic Windsor knot. In this case, a narrow ribbon is brought out and resembles a double tie. The triangle itself is small, but considered wide.
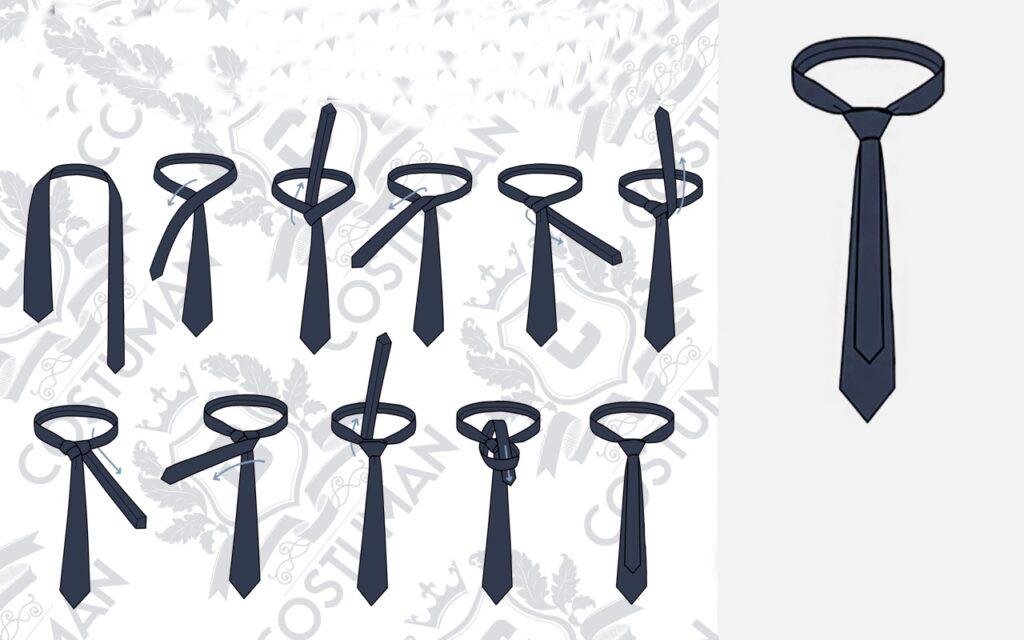
For tying, it is recommended to choose a tie with beautiful flowers of wide and narrow ends. In this case, the material can be anything. The same applies to the type of appearance of a man. This knot goes well with any tie and different shirt models.
Chestplate
Such a knot can only be used for wide ties that differ in the same ends. They should be made of lightweight and flowing materials. Also, the technique can be used for scarves, kerchiefs and shawls.
Plastron is the perfect solution for festive events. At the same time, it does not fit into everyday bows. When choosing shirts, it is recommended to give preference to models with a classic collar.
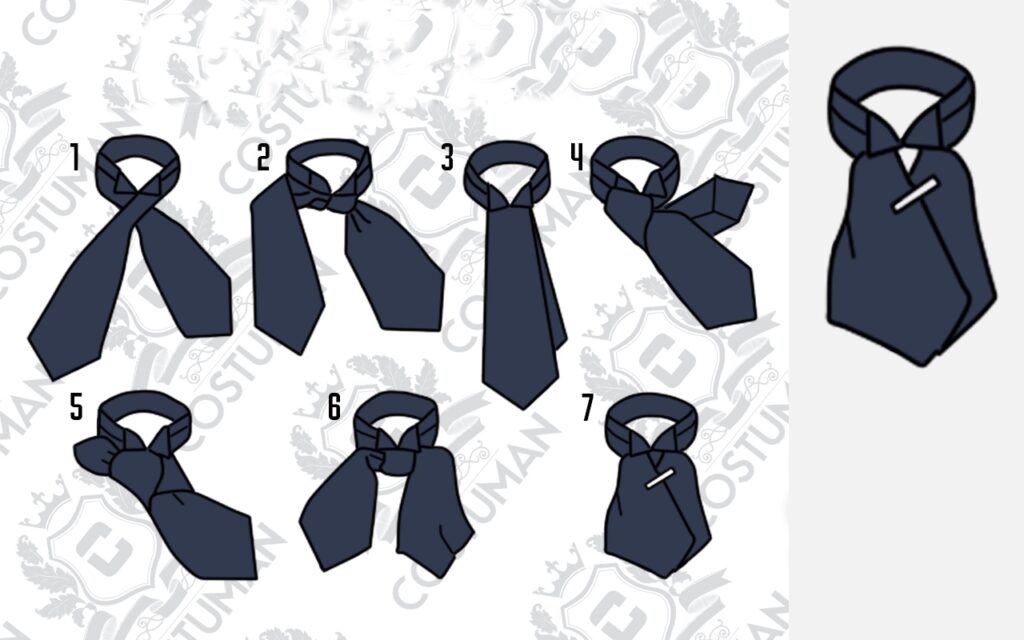
The knot is wide and covers most of the chest. The knitting method is considered not too difficult. However, in the final stage, it is important to get a neat knot.
Today there are many tie-tying techniques that look very impressive. This helps every man to choose the appropriate option, depending on the purpose of the composition and the features of his appearance.

