In today's society, with its modern rapid development of industry, it is almost impossible to find such a thing or product that could not be purchased in a store or made to order. Naturally, the finished thing will meet some established requirements or criteria, but it will lack the individuality, originality inherent in hand-made crafts. But each of us has everything we need to come up with something different and absolutely unique. The main thing is desire and a little imagination!
Look around: nature is fraught with so many interesting things! So why not take advantage of what she gives us? For example, twigs, pieces of wood, logs - all this can be successfully used for creativity. Moreover, an unusual wooden product that can give a unique look to any room is not difficult to make on your own. One has only to learn how to use the necessary tool, and you can create a wonderful decorative or practical craft with your own hands. So what can be done with wood?
Flower pot made of wood - simple and tasteful
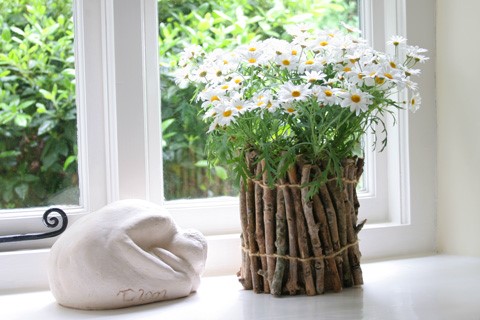
It is impossible to definitely say for sure that making a gift from a tree with your own hands is a simple task, however, if you have certain abilities and have the necessary tools, then everything is quite feasible. Of course, there are a lot of options for wood products, however, as well as the degree of complexity of their manufacture. We will talk about one of the easiest and simplest types of DIY gifts - this is an ordinary plant pot. To make such a gift, you need to use:
- Old flower pot;
- thin rope;
- Spruce or birch branches;
- Saw;
- Thread and needle.
First, cut the branches so that the size of each is approximately the same. At the same time, pay attention to the fact that the length of these branches should be more than the height of the flower pot by about 5-6 centimeters. After the branches are cut and adjusted to size, you need to take the rope prepared in advance and alternately connect the branches to each other. The photo below shows this process in more detail.
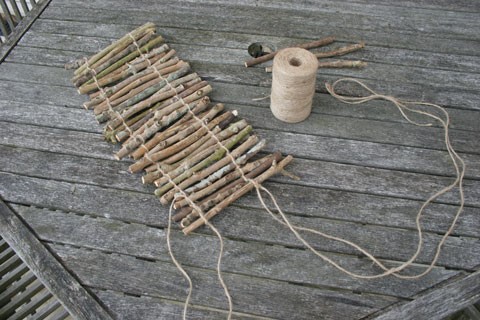
You can tie the branches together with a rope in several rows so that the appearance of the future pot is prettier and the decor for it is stronger. How to properly fasten the branches together is clearly shown in the following photo.
When the so-called branch fence is ready, you need to wrap the pot with dense material. Burlap is perfect for this. It will be in harmony with the branches, and in general it looks very natural, natural, but at the same time unusual. So that the fabric is not visible and tightly wrapped the pot, it can be carefully sewn along the inner edges or a small elastic band can be firmly sewn to the edges of the burlap in advance, with which you can then pull the material along the edges.
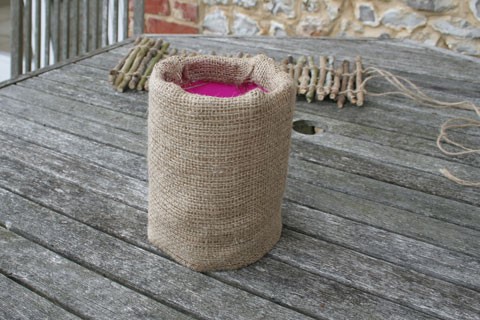
At the final stage, the flower pot must be decorated with previously prepared connected branches. Tie a thin rope around the edges, and that's it - a unique DIY home decoration is ready.
Artful vase - a stylish and beautiful gift
The idea of making a flower pot is quite interesting and unusual. The next master class will surely interest you even more. Such a thing will be a wonderful gift for mom, and it is made from the most affordable materials. And so we bring to your attention an original wooden vase. Such a gift will require a minimum, but the result will be really amazing and will not leave a person close to you indifferent. Do you want to surprise your mother and give her a lot of positive emotions? Then stock up on the following:
- Wooden planks;
- Glue for wood products or small cloves;
- Paint of any shade;
- Paint brush.
First you need to prepare the planks. They are sold in all hardware stores, so you definitely won’t have to look for them. You can buy ready-made planks of a certain length, or you can purchase 2-3 long planks and cut them into the required number of the same size. But for this you may need a saw. Before making blanks, you need to think about what size you want to get a vase in the end. Based on this, you should select wooden blocks.
When the planks are ready, they must be fastened with your own hands in the shape of a square. To do this, you will need small nails or special glue. After the work has begun and the first step towards making a chic gift vase has been made, continue to work and fasten the rest of the planks in the same way. Connect the made squares, which will act as the basis for the future vase, preferably with construction glue. You can choose the method of fastening yourself - either on top of each other, or with a slight offset. When using the second bonding method, the vase will end up looking more unusual and creative.
The most interesting stage: decoration
So, when the wooden gift frame for mom is completely ready, you need to leave it for a while to dry completely. Despite the fact that special glues for wood dry almost instantly, it is still better to play it safe and leave the frame to dry. When you are sure that the part is absolutely dry, you can proceed to the next step - painting the wooden vase. Arm yourself with paint and a brush and get creative! Don't limit yourself to one color: you can also use two, three or more shades. As they say, everything depends on the desire of the master. Thanks to the combination of colors, the vase will acquire a unique bright look.
Do you want the vase to look more solemn? Then decorate it, for example, with artificial berries or flowers. By the way, during painting, it is necessary to take into account the fact that the shade presented on the paint package may differ slightly after the wood has been stained. Therefore, we will give you a useful tip: before coating, it is advisable to try several colors and types of paint and choose the one that will look the best in the end. So, after staining, the vase will be almost ready. Now the matter is small: let it dry and hand it to your beloved mother as soon as possible. How a wooden vase should look like at the final stage of production is clearly demonstrated in the photo below.
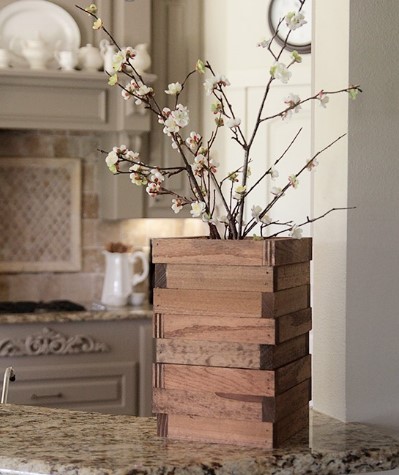
Creative magnets - a gift that will definitely be remembered
An excellent gift for mom, which can also be made with your own hands, is a wooden magnet. It will look perfect in any environment and fit even into a modern interior. In addition, the manufacture of such a gift gizmo does not take much time. In order to make such a magnet, take:
- Wooden branches (they should be different in thickness);
- Self-adhesive film or photo;
- Drill for wood products;
- Scissors;
- Glue for wood;
- Pilu;
- Small round or square magnets;
- Sandpaper.
How to make an unusual magnet: step by step
First you need to saw the wooden branches. Make cuts of any diameter you want from them. On each side, carefully go over the cuts with sandpaper. This should be done in order to end up with almost smooth branches.
When this step is completed, make small holes on one side of each cut. In this case, you just need a drill. Pour a small amount of special glue into the holes made and insert the magnet. When the glue is completely dry, use the templates to cut out interesting or unusual figures from the self-adhesive film. If you want wooden magnets to be stylish, then it is recommended to take a film of one shade. The last photo shows a finished version of home-made magnets using material cutting. Agree, such a gift will appeal to everyone!
