Creating a cozy atmosphere in your home is truly an exciting experience. With the help of various little things and decorative items, you can complement the interior or decorate the room to your taste. It’s especially nice to use something you’ve made with your own hands.

Stylish frame for the mirror
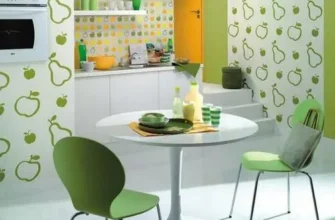
A mirror is something that can be found in every home. Without it, you can not do in the bathroom, hallway. And, of course, this is an indispensable attribute of the women's table. But it often happens that the shape of the mirror is perfect, and the frame does not fit the overall style. If you encounter such a problem, be sure to try to do it yourself.

We will prepare the necessary materials:
- mirror frame;
- napkin for decoupage;
- acrylic lacquer;
- glue;
- sandpaper;
- scissors;
- paint white.

Paint the frame with white paint and leave to dry completely. We process sandpaper irregularities. Cut a square from the napkin to the frame size. We separate the lower layers from it, since we will use only the upper one.

Using a brush, apply glue to the top of the frame. We carefully apply the napkin so as not to tear it. Leave it to dry completely. Cut out the inner part of the napkin where the mirror will be located.

Acrylic varnish cover the surface in several layers. If necessary, remove the sandpaper irregularities.

If desired, you can glue the decorative element.


Pompom mat
Of course, the choice of different mats in specialized stores is huge. But their cost is quite high. If you are faced with this situation, then it's time to turn on the fantasy and do it yourself.

To do this, you will need:
- wool threads of any shade;
- mesh for rug;
- scissors.

The main thing is to make a lot of pompons. Their number depends on the size of the rug you want to create.

When all the pompons are prepared, proceed to the connection of parts. Alternately bind each of them to the grid. By the way, if you wish, you can make a beautiful gradient or even a drawing.


So that there are no knots on the reverse side, you can sew any fabric to it.

Stylish napkins
No guest reception is complete without wipes. But sometimes the classic version in white is annoying and I want to make some variety. Especially in the summertime, bright colors and unusual solutions will be relevant. Therefore, we offer to make a stylish decor that will surely attract the attention of your friends and relatives.

We need:
- napkins of white color;
- acrylic paints in green, black and red;
- scissors;
- thin brush;
- two foam brushes;
- household sponge;
- marker.

Using a marker, we draw watermelon slices on a sponge. And the flesh and the crust need to be drawn separately from each other. If necessary, you can use the stencil. Carefully cut out the details with scissors.


Squeeze out a little paint of different shades on a flat surface.

Apply foam paint with a red paint on a sponge.


We print this element on a napkin, tightly pressing the sponge. We try to do it in any order.

Apply paint green on another element of the sponge. We print it on a napkin, leaving a small space near the red element.


We leave the napkins to dry and proceed to the drawing of the seeds. For this we use a thin brush.


Stunningly beautiful summer napkins are ready!

Polymer clay buttercups
You can beautifully decorate a room just by placing flowers. They add freshness and romance, which is why they are very often used in interiors. But, unfortunately, they quickly fade. To avoid this, we suggest making beautiful flowers from polymer clay that will decorate your apartment for a long time.

We will prepare the following materials:
- polymer clay;
- oil paints;
- acrylic glue;
- floristic wire;
- floristic ribbon;
- stack;
- dumbbell stack;
- scissors;
- Mold for prints.

Prepare the clay yellow and green.

We divide the clay into two parts. To one we add a little simple, not colored clay to make it lighter. We do the same with a piece of clay of a different color. The size should be no more than a coin, as shown in the photo.

Separate a piece of clay with a bright green hue and give it a ball shape. Bend the floral wire in the form of a loop, apply glue to it and put on the ball.

With the help of scissors we make cuts on the ball in order to give it such a shape as in the photo.

Separate four pieces of clay with a bright green hue. Make balls of them and with the help of the stack give the shape of a petal.

Apply a little glue to the bottom edge of the petals and attach to the center. Please note that the petals should not completely cover the base of the future flower.

We continue to make thin petals of bright green clay. At least 7 pieces are required. Glue them on the bottom of a little overlap.

In the same way we make petals of light green clay. The transition between shades should be smooth.

We make petals of a light yellow shade and continue to attach them to the lower edge of the flower. So that the volumetric flower does not hesitate, you can make a loop on the other end of the wire and hang it.

Gradually add bright yellow petals. In the third row, we begin to use the mold to give texture. First we roll them out, make an imprint, and only after that do we give it a curvature.

We make the last petals convex, but do not twist the tips. Getting to the establishment of sepal. To do this, you need green clay. Give a small piece in the form of a drop.

Roll it out and cut off one edge so that it is pointed. The other side rolled stack dumbbell. The result should be such an element as in the photo.

We make such blanks in the amount of five pieces. Glue to the base of the flower and leave it to dry completely in limbo.

We wind the wire with a floral tape so that the stems look more natural. If you wish, you can make several such flowers. In a single composition, they look very beautiful.


Stands for hot
To keep the surface of the table in perfect condition for many years is quite real! To do this, it is enough to make a stand under the hot.

You will need:
- rope;
- glue;
- scissors.
We cut a piece of rope of the right size, fold it in half and glue the halves together.

Apply glue to the outer part and glue another piece of rope.


Cut the edge of the rope.

Glue the rope in the same way until you get a stand of the desired size.

Leave the product until dry.

Stylish and very comfortable stand ready!

Decorative pillow

We will prepare the following materials:
- fabric with a pattern for the back of the pillow;
- plain fabric;
- colored fabric for the facade;
- felt;
- sintepon;
- button;
- black fabric paint;
- brush;
- sewing machine;
- scissors;
- pins;
- knife;
- marker;
- mat for cutting.

From a single-colored fabric cut a triangle to create a roof.

Cut out a piece for the facade from colored fabric. We connect them together with pins and sew with a typewriter.

Apply the pattern on the roof as shown in the photo. On the other segments, which are designed for windows, draw a window frame.

Tuck the segments with the windows a few millimeters and pin them to the front with pins.

Sew them with a sewing machine.

Cut a blank for the door from felt, fix with pins and sew. Then sew a button, which will be instead of the door handle.
Put the front of the pillow on the fabric, which is designed for the back side and outlines the contours. Cut and sew the front side inside. We leave a few centimeters to turn the workpiece.

We fill it with padding polyester and sew it manually.

Such a pillow will be an excellent element of decor and will definitely appeal to children.


Clay vase
There are always little things in the house for which there is no special place. That is why we offer to make a small vase of an interesting form, in which you can leave jewelry, keys and other small items.


You will need these tools:
- clay that does not need to be baked or gypsum;
- gloss varnish;
- brush;
- rolling pin;
- construction knife;
- beautiful leaves.

Roll a small piece of clay into a medium thickness layer.

Put a leaf on top of it. Leaf edges should not be outside of the clay.

With gentle movements with the help of a rolling pin, we roll a leaf into the clay so that the design is better imprinted.

Gently remove the leaf, starting from one edge.

Using a construction knife, we cut the clay so as to give it a leaf shape.


Carefully lift the reservoir and put it in a plate of a suitable shape.

Leave the clay to dry completely. Remove the product and put it on the bottom of the plate so that the lower part also dries out. We cover the product with a glossy varnish in several layers.


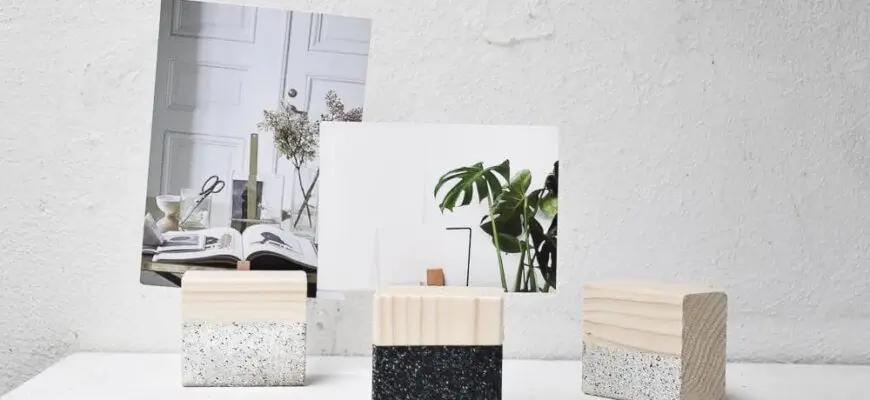
Do it yourself
A tray is an indispensable thing in every home. It can be used for serving breakfast, drinks, and just for decoration.

For the manufacture will need:
- frame for a photo or a picture with glass;
- paint the desired color;
- vintage pens;
- small screws;
- cloth;
- brush;
- glue in the gun.

Paint the frame with a paint of a suitable color.

Attach vintage pens to the frame.


We wrap the back of the frame with a cloth and glue the ends with hot glue in a gun.


We connect all parts of the frame and, if necessary, glue together.


A lovely tray is ready!


Paper Organizer
Every home needs small pieces of paper for writing or for making a list of products. We offer to make an interesting organizer for them with your own hands.

You will need:
- polymer clay;
- paint;
- small brush;
- rolling pin;
- knife;
- paper;
- sponge;
- ruler;
- food parchment;
- glue;
- clear nail polish;
- pencil.

Depending on the desired dimensions, we draw a template for the future organizer on paper.

Roll out a layer of polymer clay on food parchment.

Put the templates on top of the reservoir and cut them with a knife. Cover the baking tray with parchment and transfer the clay blanks to it. Bake them according to the manufacturer's instructions and leave to cool completely.

Glue together the details.

Dilute the paint with water and apply it with a sponge on the surface of the organizer. Leave to dry completely.

At will it is possible to put drawing or points of other color over the main.

We cover the product with clear varnish.


Everyone can create something interesting and unusual for the interior of the house. Just enough to stock up on the necessary materials, as well as show imagination and a little patience. And the result will pleasantly surprise you.